
CLICK HERE FOR DOWNLOAD -> EXPNAV2_151113.zip
All Prior Advent Firmware Updates are
included in this version. There is no need to upgrade to any version prior to
this before using this firmware.
This is a maintenance update to
address the following items:
- New Sync Release and Vehicle hardware changes in Production.
- No Sync Voice
- SWC controls not operating
- Navigation/More Icon not showing
- Volume decrease when Changing sources
- Several other changes were made based upon customer feedback:
- While in Reverse the Audio is no longer muted.
- A long press of the “♪” key on the radio
controls will switch directly out of Nav.
6.13.16 Release Notes:
Added 2016 Model Year Selection, once updated click into Interface Setting / Others /Select Year Model.
Notes:
2012-2015 Ford SYNC2 vehicles have the AUX input which we utilize to input audio to factory system. In 2016 Ford SYNC2 vehicles removed the AUX function. Therefore, if you use old Firmware and do not select the 2016 in the interface setting every time you click HDMI, it will switch the source to AUX and not function.
All Firmware files are
compressed to make it easier and faster to download. When you download this
file to your computer you will need a program to uncompress the files. This is
called “UNZIPPING”. There are many free programs to do this and your computer
may have already come with a program built in to do this. If you require a
program we recommend WINZIP.
WINZIP is free and can be
downloaded here: http://www.winzip.com/downwz.htm Follow
the instructions at the WinZip site for use of this utility. Please follow the instructions
below for performing the update to your radio.
NOTE: YOU MUST LOAD THE NEW
SOFTWARE ON A USB STICK. THE FIRMWARE YOU DOWNLOADED IS SPECIFIC TO THE MODEL
PRODUCT YOU HAVE SELECTED.
THESE INSTRUCTIONS
ARE BASED UPON USING A WINDOWS BASED OPERATING COMPUTER. APPLE USERS MAY HAVE
DIFFERENT STEPS NEEDED. WE RECOMMEND USING A PC FOR DOWNLOADING, FORMATTING OF
THE USB, AND UNZIPPING THE FILES ARE THE NAV SYSTEMS RUN ON A WINDOWS BASED
OPERATING SYSTEM.
To update the firmware:
You need a USB
Memory stick with 2gb or greater of memory; this can
be purchased at any office supply store. Insert the USB stick your computer. Follow the directions carefully.
When you first place
the USB stick into your computer and it asks “DO YOU WANT TO FORMAT THIS DEVICE?”
select yes. This insures the stick has nothing else on it.
Unzip the file you
downloaded and copy all files to the USB Stick
Start with the key
off. (Or Power off if on the bench)
Insert the updated
USB Stick into the Navigation USB Jack. The Vehicle factory USB jack will not
work.
Turn the radio on.
Wait for it to boot up. Hit the Menu button, Go to settings and go to the
second page, push update system. Follow the on-screen instructions.
Wait until the radio reboots completely
and the Radio Screen comes up; do not stop the update,
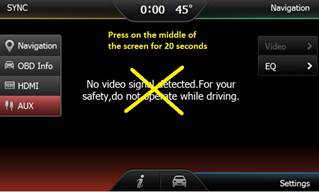
If after the update
the screen controls in the Nav system do not respond
to the correct position when pressing on the screen follow the below steps to
re-calibrate the screen. This MUST be done when in the Nav
mode.
Press
on the screen where the yellow cross is located to access the calibration
screen. Follow instructions on the screen to complete calibration.
Press the Screen and hold for 5 seconds Press on the Cross on the screen.

You’re finished.
This process should not take more than about 5 or 10 minutes to complete.
Technical Support: 1-800-323-4815